Showing posts with label sewing. Show all posts

Wednesday, March 14, 2012

Mend it Better

I am so excited to announce that I am in a book! Mend it Better by Kristin Roach came out in February, and I was thrilled to be a contributor.


I have been a long time reader of Kristin's blog, Craft Leftovers, so when she put out a call for submissions for her book I was very excited.


I originally blogged about this sweater project on my old blog here, but the short version is that I found a gorgeous cashmere sweater at a thrift store for a couple of bucks. When I got home, I realized that there were a few small holes. Luckily they were in inconspicuous places and I decided to do buttonhole stitch around the holes, so they wouldn't get any bigger. Then I sewed beads around the holes to look like flowers and stems.

There are a number of great projects and step-by-step techniques included in this book. I love that there are both specific projects and great inspiration for mending anything. As someone who shops at thrift stores a lot I think this book is indispensable.

Thanks to Kristin and the staff at Storey for including my sweater! To read more about the book, visit the Mend It Better website, and be sure to visit the Storey Publishing Facebook page as well. Storey is even offering a giveaway here and on the other sites of the blog tour--leave a comment by 8:00 pm Eastern on March 18th and you could win a free copy of Mend It Better!

Thanks to all who entered the contest! The random number generator came up with number 3, NL Clark! Congratulations!

Sunday, March 11, 2012

Tooth Fairy Pillow

This was one of those fly-by-the-seat-of-my-pants crafting experiences that turned out really well. I made the entire project, from cutting out fabric to embroidering to stuffing and sewing it up (not to mention designing it as I went), in less than half an hour, using only materials I had in my craft room. My five-year-old cousin had his first loose tooth and clearly he need someplace to put the tooth for the Tooth Fairy to exchange it for money.


I drew a tooth shape freehand onto a piece of felt folded in half (so I would have two identical pieces), and cut it out. I also cut out a blue square for the pocket, and wrote his name on it with a disappearing marker. I chain-stitched his name with embroidery thread (this part may take you a little longer if it's a long name), then blanket-stitched three sides of the pocket to the front of the tooth. I turned the two right sides together and stitched around most of the edge, leaving an opening for stuffing. I turned it right side out, using a knitting needle to poke out the points, then stuffed it, folded the edges of the opening in, and stitched the opening closed. Quick, fun and easy, and my cousin was thrilled!

Sunday, February 26, 2012

Spur-of-the-Moment Cell Phone Case

This past fall I downgraded my cell phone from a smartphone to just a regular old cell phone. Partly because I was tired of paying the data fees when I didn't use enough data to make it worth it, and partly because I don't need the distraction of a smartphone. My new phone has a large touch screen, and I wanted to protect it, not to mention be able to find my phone quickly in the black hole that is my bag.


A few months later, I finally got around to making one. I briefly looked for a pattern but didn't find one, so I just played it by ear. My perfectionist tendencies almost got the better of me (when you wing it things don't usually work out perfectly), but I kept going and after about half an hour I called it good and threw it in my bag. And really, the more I see it, the more I love it. Sometimes I need to use things for a bit to realize how much I like them.


I have a bag of wool fabric scraps that I purchased at the NH Wool Arts Tour a few years ago (I've been making a braided rug with most of them). I found one wide enough to cover my phone and folded up the bottom edge, leaving enough fabric at the top for a flap, and sewed the sides together to form the base. Then I hemmed the edges and bottom of the flap.


My husband had told me that it was bad for wool to have direct contact with electronics, because of static electricity, so I knew I needed a lining. I had a packet of fabric squares from a 1930s fabric collection, so I sewed two together with the right sides facing, and hemmed the top edge. Then I carefully sewed the lining into the case by hand. It's slightly visible on the outside but not enough that it bothers me.


I picked out a button from my button jars, sewed it on, and snipped a slit large enough for the button. Even though it's wool and partially felted, I decided to blanket stitch around the opening to make it more secure. I couldn't find embroidery thread so I just used regular sewing thread. Lastly, I sewed on some felt flowers I bought a few years ago. It looks a little wonky but it does a great job, and I can always find my phone easily. Even though I got a little frustrated at times, sometimes just going for it and using what I have on hand is the best way to go.

Sunday, September 4, 2011

Summer Wardrobe: Reverse Applique Kerchief


Ever since I saw the book Alabama Stitch Book, I was intrigued by the idea of reverse applique, along with many other stitching techniques presented there. This form of reverse applique is a little easier than the traditional version, where you have to turn the edges under (as I was told by a quilting friend).


In this project, you paint on the top fabric with fabric paint (I used a stencil included in the book) and then use a running stitch to secure it to the bottom fabric. After that, you snip out the inside pieces with embroidery scissors, leaving 1/4" of fabric between the stitches and cutting line.


I'm very pleased with how it came out. The running stitch is hand-stitched, so it can be a bit time-consuming, but it's a great TV project because you don't really have to think about what you're doing, besides trying to keep the stitches somewhat even. And really, the obvious handmade quality is part of the charm, so there's no need to rip out less-than-perfect stitches.


It's great for keeping my hair out of my face during the summer months, but I plan to wear this well into the fall!

Tuesday, August 23, 2011

Summer Wardrobe: Wiksten Tank

As part of my plan to sew at least one project a month throughout this year, and as one of my goals to make more of my own clothes and accessories, I decided I wanted to try to make a garment. I am a big fan of Jenny Gordy's blog Wiksten Made and her clothing line, Wiksten, so I was thrilled when she released her Tank Top and Dress pattern.


This is my first sewn garment that fits, and it fits well. I was a little nervous about how the tank would look on me, but I'm thrilled with the fit. I think it's universally flattering and it is so comfortable.


Jenny's instructions were very clear and helpful. There were a couple of times when I wasn't entirely sure what I was doing, but I trusted her directions and did what she told me, and eventually everything became clear. I'm not a very experienced seamstress but I had no trouble following these directions, and I can't praise the pattern the pattern enough.


The adorable pocket detail is one of my favorite parts. I think the fabric is vintage--I got it at a barn sale last summer. I was happy to find such great fabric for this project in my stash.

I'd like to make the dress version, and I also have Jenny's Tova shirt and dress pattern that looks perfect for fall. So much to sew, so little time...

Monday, August 22, 2011

Summer Wardrobe: Tote Bags


As part of my plan to sew at least one project a month, I made two tote bags in July (I'll catch up on April through June soon). I'm also trying to craft with the seasons and create more of my own clothes and accessories. Even though I was busy this summer I managed to make several things for my summer wardrobe. Link

The first one was the Broadturn Bag from Amanda Blake Soule's wonderful book Handmade Home. This is one of my favorite craft books. It's a wonderful blend of personal history, beautiful photographs, clear instructions, and projects that fit my aesthetic, budget, and lifestyle. This is not an easy feat! One thing I love about it is the frugal Yankee mindset that runs throughout it--this is something that runs in my family as well, and it's very inspiring to see it executed so beautifully in this book.


I had a little bit of trouble sewing the oval bottom to the body of the bag, but i often have trouble with that. I dug into my stash of fabric and found a large piece from my grandmother that had panels of coordinating fabric already sewn together. I separated the two fabrics and used one for the strap and the other for the body and bottom of the bag. I was pleased with myself for using stash fabric and for completing this quick and easy bag! It's already come in handy for corralling books, craft supplies and other random items for day trips.


I also made the Inside Out Bag from The Purl Bee. I love this blog so much, and over the years I have been able to make so many things from my stash thanks to the inspiration I've found there.


Instead of bias tape, I used extra-wide ribbon I had lying around. There is a great fabric shop around the corner from me and they sell huge rolls of ribbon for a dollar. A dollar for the entire roll, not a dollar a yard! This means I end up with a lot of ribbon. I also used some great red fabric from the stash that I had originally intended to make curtains with, but I've been using it for other projects here and there. This bag has also seen lots of use--the magazine pocket and smaller pockets are genius! I'm always carrying magazines with me and I hate when they get wrinkled, but that doesn't happen with the special pocket.


I'm still learning about sewing, but I'm glad I've been pushing myself to complete sewing projects every month. I even made my first garment, which I'll share next time.

Thursday, March 31, 2011

March Sewing Projects, Part I

I have done quite a bit of sewing this past month, but I can only show you some of it right now.


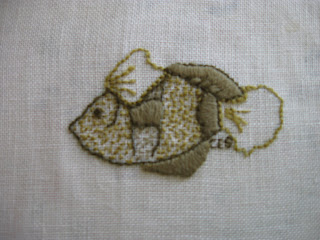
I made this crewel embroidered fish for my cousin's 5th birthday. He loves fishing and he is really looking forward to getting back out to the lake this spring.


Someone in my embroidery group brought this pattern in, along with other patterns, when we were working on crewel stitches. There was no stitch guide so I just looked at my copy of The New Crewel and did what I felt like. I used random wool from my stash of crewel wool, some of which came from my great grandmother.


My cousin also loves to cook, and I sewed him an apron to go with the cookbook we got him. Unfortunately, I forgot to take a picture of the apron (probably because I was finishing it 20 minutes before we left for his birthday party). I used this pattern, which you should really read even if you don't sew because it's hilarious. It is also really helpful and informative, even though I didn't follow all of the directions exactly. It seem that lately I have just been crafting by the seat of my pants, and if it doesn't work, I just rip it out and go at it again. That's one advantage that sewing has over knitting--ripping out is much faster, although sometimes the fabric doesn't hold up as well as the yarn does.

Next up, more sewing and lots of baby things!

Thursday, February 17, 2011

February's Sewing Project

Since I procrastinated last month I wanted to get started on February's sewing project a little earlier, in keeping with my New Year's Resolution to complete one sewing project a month. I was lucky enough to have a snow day a couple of weeks ago, so I went up to my sewing room, dug through the stash, and whipped up this magazine holder. Not because I'm such an awesome seamstress but because the pattern was so easy.


The pattern is from Lotta Jansdotter's book Simple Sewing, which I highly recommend. She explains everything clearly and has excellent diagrams, which I need. It's also nice to make something useful for my home and use up some stash fabric. My next sewing project will probably be from this book also.

Wednesday, February 2, 2011

Wee and Wonderful


One of my New Year's resolutions is to complete one sewing project a month. I have lots of fabric, and I would like to sew better. It's not always something I can do in front of the television or with other people around, since my sewing machine and materials are upstairs. If I don't make an effort to try new projects, though, I won't get any better (and I won't use up that fabric stash, either). I'd like to do more than one project a month, but I'll start with one for now.


January's project was Evelyn Inchworm. My future brother- and sister-in-law gave me Hillary Lang's Wee Wonderfuls book for Christmas, and Evelyn is the first project in the book. I have been reading Hillary's wonderful blog for years, and I've always wanted to make her projects, but my lack of sewing skills and not making the time for it held me back. I was excited to see her book and also pleasantly surprised. This is not just a book of stuffed animals (although with Hillary's clear instructions and fantastic designs, it would still be worth every penny)--there is an adorable dog necklace, an upside-down doll, and a paper-doll pillow, among many others.


I'm proud of myself for using materials I had on hand. I found the light blue and dark blue felt in a bag at a giant church yard sale with a great vintage pattern for felt flower pins, and the kerchief is made from one piece of fabric from a Moda Charm Squares pack. I love the pack and the kerchief was the perfect use for the square. I'm also proud of myself for using the square and not just hoarding the whole pack. Evelyn is now living on my desk at work and I smile every time I see her.

This is a hand sewing project, so it was a good, easy way for me to start. I have some experience with sewing machines, but I need to try new projects to keep learning more. I'm already ahead for February, since I had a snow day today and made another project, which I'll share soon.